Friday, March 30, 2012

Dill Roasted Carrots

We have come to that point. My first not-blended food post. For the past 5 weeks Nathan has been living off of a purely liquid diet (with rare exceptions for cookies and recess peanut butter cups which he rips apart into teeny tiny pieces and eats over the course of an hour, THAT is dedication folks). We are now boldly moving forward into a world of soft foods that are not blended. Here's a first glimpse into the land of the chewing.


These are Dill Roasted Carrots and they are probably the best food ever. The first time I made them was when Nathan was still really early in his recovery (which was kinda mean since he couldn't eat any.) It turns out I have zero self control and I may have accidentally eaten 15 or so carrots the first time I made them... and then I made them again the next day bringing the total to 25 carrots in two days. I had to promise myself not to make them for a while after that because I was afraid of turning orange.


This recipe is for making them with dill, but you can use any spice you like. I've made them with curry powder and that was super tasty too. 

___________________________________


Ingredients:
8-10 carrots
olive oil
dill
salt and pepper

Start preheating the oven to 400degrees.  While you're waiting for it to heat up wash, peel and arrange the carrots on a baking sheet. I lined mine with foil so that it would be easy to clean.


Drizzle olive oil over the carrots and sprinkle with salt, pepper, and dill. Be relatively liberal since not all of the spices will end up sticking to the carrots. Use your hands to distribute the oil and spices evenly on each carrot. When your oven is hot pop the carrots in and set a timer for 20 minutes.


 When your timer goes off, pull them out and flip them over so that they will brown evenly. I used chopsticks to do the flipping since these are hot 400 degree carrots. You could probably use tongs or something else grabby if you didn't want to use chopsticks.


just grab and flip!


Pop back in and time for another 20 minutes. I had very thin carrots so 40 minutes was enough, but depending on the thickness of your carrots they might need just a bit longer to finish. The finished carrot should be just a bit crispy on the outside and soft on the inside. If you need more time just flip them again and pop them in for another 10 -15 minutes. 


Enjoy!

Directions:
1. Preheat oven to 400 degrees
2. Wash and peel carrots
3. Drizzle with olive oil and spices, use hand to evenly distribute oil mixture on each carrot
4. Bake for 20 minutes
5. Flip carrots
6. Bake for another 20 minutes
7. Check for doneness (varies with carrot thickness) Flip and bake for 10-15 more minutes if they are thicker carrots.
8. Serve and enjoy! (they are best when still warm from the oven.)

Get well soon!
Elizabeth and Nathan

Thursday, March 29, 2012

Will it Blend? um... maybe not...

Failures at blending.


Most things blend. Really.

I've been told that even hamburgers blend (I don't have the guts to test this theory, but I believe my source none the less).

Blueberries however have become the bane of our blending existence. We tried twice to make fresh blueberry milkshakes and each time the result was something akin to chunky sweet blueberry cheese. ewww.

A brief scan of the internet seems to confirm that we are not alone in our fresh blueberry troubles, blueberries apparently have a high acid content which makes any dairy they come in contact with curdle. That wasn't the big surprise. The part where it gets weird is that apparently because of a high pectin content the curdled bits quickly start to re-solidify into a semi-solid block or chunky blueberry-dairyness. This makes the whole thing about a million times worse than regular curdled dairy product.

So basically, this post is just a warning, don't mix fresh blueberries and dairy, it's really really gross (and you'll feel sad because you just wasted expensive blueberries). Also, if anyone has a solution, let us know!

Get well soon!
Elizabeth and Nathan

Wednesday, March 28, 2012

Easy (and healthy!) Broccoli Soup with toppings!

It got a little stormy this weekend. We had blue skies and warm weather Saturday and Sunday morning, but by Sunday afternoon there was rain and palm tree parts flying around outside. Palm tree parts are probably the worst part about storms here, they are pretty large and end up all over the place when it's windy.

We might have underestimated the weather when we went out for a walk on Sunday... (at this point Nathan was saying "stop taking pictures we need to get home!" and I was trying to figure out how to take pictures without getting rain inside my phone)

Palm trees weren't the only casualties, there were also a couple of trees that lost largish branches in the park by our house. Nathan was considering taking one home (about 12 feet long), 'cause it would be a cool trophy from our walk, but in the end we left it under the tree it fell out of. 

So basically to sum it all up, Sunday was a perfect soup day. We settled on a broccoli soup since we had a big Costco bag of florets in the fridge. This soup is super full of vegetabley goodness, and is super simple to make. We hope you enjoy it!

__________________________________________


Ingredients:
1 - onion diced
1 lb - broccoli
32 oz. - chicken stock
1 cup - water
1 tsp - garlic powder
red pepper flakes and salt to taste

Optional toppings:
bacon bits
sautéed mushrooms
cheddar cheese 
tabasco sauce
cashews

Get all your ingredients ready. For this soup I used a bag of ready cut broccoli florets. That made it super easy to prepare since I could just dump them into the pot. I kinda feel like that was cheating, but for some reason they were actually cheaper precut at Costco than whole at our Von's, so in the cart they went!

These bacon bits are pretty good, they are kind of like bacon and kind of like beef jerky. A friend left them at our house after a baked potato party and they worked really well on the soup.


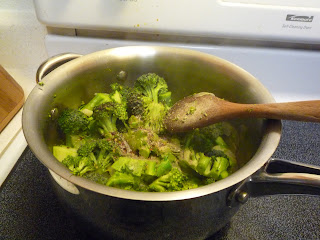
Start by sauteing your onion in a little butter or oil until they cook down and get soft. Now just dump your broccoli on top. Throw in your seasoning and add your chicken broth and water.


Bring the whole thing to a simmer and cover with a lid. Cook for 10 minutes or until the broccoli gets tender.


While you're waiting for the broccoli to soften you can work on making some of the toppings. We bought a box of mushrooms at Costco so I decided to use those as one of the toppings. I started by selecting and washing 5 medium sized mushrooms. You can totally skip this step and make other toppings if you like. I think cheddar cheese would be good, we were out, but next time I make this I'm getting cheese.


and of course I took the picture before washing them... ewwww...

Wash them and slice them thinly.

Throw them in a pan with a bit of butter.

Now just poke them around a bit until they cook down and look like cooked mushrooms.

Ok! Now back to the soup! Your broccoli should be pretty soft now so we can start going after it with the immersion blender. There may be some broccoli sticking up out of the liquid try to smoosh it down as you blend (this is why the broccoli needs to be super soft). Also, be careful, immersion blenders can shoot hot soup at you when they are not fully immersed. If you are worried about this whole immersion blender/scalding hot soup thing you can always use a traditional blender instead, I was just feeling lazy.

smooshing broccoli with my immersion blender

partially blended

fully blended!

Now that you've blended everything check to make sure the soup is the consistency that you want. It might be a little on the thick side, if that is the case you can thin it a bit with some more chicken broth or water. If you are feeling daring you can thin it out with a cream to make a cream of broccoli soup. Serve it up hot and cover with your favorite toppings!

poor little bread bowl getting photographed on our wet balcony.

We ate ours with a loaf of sourdough bread from Boudins, and yes I reused my bread bowl from lunch... we're still students and I have this compulsion to always take my leftovers home. Maybe that's weird.. but I'm going to vote for frugal. :)


Directions:
1. Saute diced onions in butter until soft
2. Add broccoli, spices, and chicken broth and bring to a low boil
3. Cover and let simmer for 10 min or until broccoli is very tender
4. Blend the soup adding more liquid (broth or water) to achieve desired thickness (add cream to make a cream of broccoli soup).
5. Serve up and cover in toppings!
6. Enjoy!


Get well soon!
Elizabeth and Nathan


Tuesday, March 27, 2012

Goodbye Arch Bars!

Last view of Nathan's arch bars

these babies are GONE!

We are happy to announce that as of 4:00 today Nathan is arch bar free! No more pokey wires jabbing his gums, no more getting his lips snagged when he tries to talk. He had to go under anesthesia to get them taken out (they were embedded in his gums somehow, I prefer not to think about it too hard). The whole procedure was pretty quick and when he came out he was super chipper and chatty, I think a mix between recovering from being "under" and excitement about being able to talk pain free for the first time in weeks. He's still pretty happy, in fact, he just walked by and showed my his gums again (you know... as you do).

The nurse informed me that his first words when he came out of surgery were "I can smile!!" Which was nearly on par with his first words when he came out of surgery last time which were "I can run across the parp!" (albiet in written form since he couldn't talk last time). Click here for context.


Get well soon!
Elizabeth and Nathan


Monday, March 26, 2012

Fresh Strawberry Milkshake

Now that Nathan's starting to feel a bit more chipper, he's started creating his own concoctions on the Vitamix. Here's his latest success, a fresh strawberry milkshake:


This recipe is the simplest so far, and is honestly, it is probably the best thing we've made with strawberries. If you have access to fresh ripe strawberries this is super duper yummy since it captures and highlights the flavor of the fruit.

Ingredients (makes two servings):
1 lb - fresh strawberries
2 cups - vanilla ice cream

Directions:
Place your washed, destemed and hulled the strawberries in the blender and pulse until completely liquified. Add the ice cream and continue to blend until smooth. Poor into glasses and enjoy immediately. 

I am only medium ashamed to say we had these for dinner earlier this week... I mean what's the fun of being a grown up if you can't have shakes for dinner once in a while... right? :)

Get well soon!
Elizabeth and Nathan


Sunday, March 25, 2012

Sunday Lunch Test Run

We have a weekly tradition of going out to lunch with friends after church. Sadly we haven't gone since the surgery, as there are not many places that serve broken jaw compatible food. Last night Nathan announced he wanted to give eating out another shot, so after church today we headed out with our housemate Lauren and her boyfriend Nathan (yes, we have a lot of Nathan's running around here) to Boudin's for lunch.


I didn't get the memo to make a funny face, I'll try to do better next time. (you can click on the photo to make it bigger so you can fully enjoy Nathan's expression)


Lauren and her Nathan, enjoying yummy sourdoughy lunches.


Lunch was a super success and Nathan was able to eat his chili and most of his bread bowl (the crust proved to be a bit too chewy, but the rest was fine). We also owe Lauren a a big thank you for telling us about the Boudin's rewards program. Basically every month you can get a free loaf of bread fresh bread if you eat there. So we also picked up our free loaf today, yay! 


Get well soon!
Elizabeth and Nathan

Saturday, March 24, 2012

Updates!

It's been a little while since our last post so here's the latest news! :)

Nathan holding a Pi Pie and looking skeptical.

First off Nathan is doing really well. He can now:

1. open his mouth!! (and he only has to wear his rubber bands at night!! yay!!)
2. eat with a spoon!!
3. walk without causing pain to his jaw.
4. smile nearly symmetrically (and he even has his dimple back!)
5. talk on the phone and be understood by the person on the other side.
6. sort of "chew" soft things!!!
7. wink his left eye (and bonus, he can now close his left eye well enough so that he doesn't get soap in it)

We are still waiting to see how much his facial nerve continues to recover, they said it can take months before we'll know. Parts of his face are still numb, and while he has move movement in his left eyelid, his left eyebrow is still recovering (ie. it doesn't move yet, this has allowed Nathan to perfect his new "skeptical look" which consists of him raising his right eyebrow exclusively, it's a pretty convincing look). Monday he goes in to get his wire bands taken off, and Tuesday he has his dental appointment for his broken tooth!

He's also jokingly promoting the "wired jaw diet." The oral surgeon said it's normal for people to lose around 15 pounds when they break their jaw (due mostly to it hurting a lot to eat and drink in the first weeks post surgery). Nathan is no exception and has lost his 15 pounds; turns out weight loss is easy if you can't eat anything. Probably not the best or healthiest way to reach your goal weight, but there you go. We'll be working on incorporating exercise back into our routine slowly and hopefully we'll be a bit more balanced and healthy soon (Nathan couldn't do much running or walking earlier because the impact jostled his jaw).

__________________________


And now as promised, here are a couple exciting events from the past week or so:

First off, we had a lovely Pi/pie day on March 14th (3-14) with our small group. We made two pies to celebrate, a chocolate pudding pie and a chocolate oreo pie. We made the choice for pudding because 1.) Nathan can eat it, and 2.) We already had all the ingredients. :)

Pi Pie!!!

We also went out to eat for the first time since the accident (and ordered real food!!). Our friend Margaret just passed her Master's defence this last week so we took her out for a celebratory dinner at Rock Bottom Brewery. Nathan got the Bacon Mac and Cheese and was totally up to the challenge. :)

I forgot to take my camera, so this is an image I found online of Rock Bottom regular Mac and Cheese. Please imagine bacon on top for a more representative image.

Lastly, we were lucky enough to have our friend from Seattle visit us. :) Nathan was stuck grading the day she was here, so we had a girls night out at Disneyland which was super fun. I tried to convince her to move down here so that we could go to Disneyland together all the time, but she seemed hesitant, something to do with already having a house and a job elsewhere.... sigh... it was worth a try...

riding Charger on the King Arthur Carousal... Yes, we named our horses

Mine had a lion painted on the side, so at first I thought I'd name him Aslan, but then that seemed like a weird horse name, so I tried to change it to Bree, but the ride was already halfway over... so I'm not sure if it counted.

About to get spooked at the Haunted Mansion!

That's it for now, more recipes and updates to come soon!
Elizabeth and Nathan

Friday, March 16, 2012

Beach Day


Another chewing free date!


We had originally planned to go to the zoo together this weekend, but Nathan's swelling got pretty bad and he was feeling pretty tired. The San Diego Zoo is not a place to go if you are already feeling exhausted, so Nathan took me to the beach instead. Here's some pictures from our day out. :)

Note: there's still time to visit us before we move! This beach could be yours too!

View of La Jolla Cove


View of La Jolla Shores


Love Ducks! [if you click the link go to min 5:03] :)


Scripts pier


Nathan!


Pelicans and palm trees


We had a really fun time, although it was a little too cloudy to have a good sunset. I think I'm going to miss living by the beach! :(


Get well soon!
Elizabeth and Nathan

Tuesday, March 13, 2012

Hearty Turkey Chili

We haven't had any meat since the accident since we've been a little scared of blending meat. (Well, actually, I did blend some chicken the first week, but it didn't turn out too well...). Up until now Nathan has been getting most of his protein from dairy, tofu, beans and quinoa. However, this week we decided it was time to give meat a second chance.

my bowl, since avocados make Nathan throw up... poor dude.

Chili seemed like a good place to start, since it's already soupy anyway. I ate mine unblended (see photo above), and Nathan ate his blended (photo at the bottom of post). Both turned out well, and when Nathan can chew again I might still blend a couple cups of the chili and mix it back into the main batch because it makes it extra thick and yummy.

Ingredients:
1 lb. - ground turkey
1 - onion diced
4 cloves - garlic diced
2 - jalapenos diced (less for less heat, or sub a green bell pepper to avoid spiciness altogether) 
2 Tbsp - chili powder
28 oz. - crushed tomatoes
16 oz. - chicken stock
salt and pepper to taste

There is way too much chicken stock in this photo, I don't know what I was thinking.

Start by sauteing the onions, garlic and pepper in olive oil at the bottom of your soup pot. Wait for them to get a little soft, around 5 min. 


Next add your chili powder. Stir the whole think around for a minute or so, add a splash of the chicken broth if things begin to stick.


Throw in your turkey.

my turkey was still a little frozen, but I slowly broke it up and all was fine. Who needs defrosting, not me! (maybe... might have to revisit that stance later...)

Cook until turkey is thoroughly cooked. If the turkey was not very lean you can drain some of the grease off now.


Now add your tomatos and chicken stock. Mine were frozen in a ziplock bag in the freezer (we buy the big cans from Costco and freeze them in usable portions, really cheap that way).


Let everything simmer for about 15 min to let the flavors mingle.


Garnish with cilantro, lime, avocado, cheese, sour cream, or anything else that sounds yummy to you.
Enjoy!

_______________________________________________


Optional Blending Steps for Broken Jaw Folks:


Toss some in the blender with a few sprigs of cilantro

Blend on high until you get a soupy consistency. Add more chicken broth here if it is not liquidly enough (You want to make sure it's thin enough that you can easily drink it).

Enjoy!

Get well soon!
Elizabeth and Nathan


Monday, March 12, 2012

Cheddar Broccoli Soup

Our poor celery had been in the back of the fridge for several weeks and didn't look like it was going to survive much longer. To give it one last shot at a meaningful life we decided to make this tasty broccoli soup. :)


The celery from the back of the fridge... sad celery?... or possibly hip mustache celery?

If you ever find yourself in this situation know that you can partially revive celery by cutting of the bottom and sticking it in a cup of water. However, if you are putting on making a blended soup you can skip reviving it since the goal is to make it mushy anyway.

Ingredients:
1 - onion
32 oz. - chicken stock
3 - garlic cloves
2 - small heads broccoli (or one big head, our grocery store only had tiny ones left)
3 - stalks celery
1/2 cup - cream
1/4 - tsp red pepper flakes (more or less to adjust spiciness)
1 cup - shredded cheddar (which I totally forgot to put in the photo! sorry!)
salt and pepper to taste


Start by dicing the onion, garlic and celery. Don't worry about uniformity, since we're going to blend it later. 


Saute the diced onion, garlic, and celery in butter until soft. While you're waiting cut up your broccoli into small chunks (smaller chunks make it cook faster which is good!).


When the onions are soft add the broccoli and spices and stir around.


Next add your chicken stock and let the whole thing simmer until the broccoli pieces are tender. Transfer the mixture to the blender and blend adding the cream and the cheese. 

 Enjoy!

Note: If you are reading this and, like Nathan, are recovering from jaw surgery we recommend leaving out the cheddar cheese. Even though it was melted Nathan still had trouble with it getting stuck in his wires. That made this soup hard to eat durring the rubber-banded phase of his recovery.

Get well soon!
Elizabeth and Nathan